- Step 1: Set Up Your Accounts
- Step 2: Create a New Automation On LenzVU and Set The Entrance Condition
- Step 3: Build The Automation You Want Your Clients To Enter
- Step 4: Make Your Excel Sheet
- Step 5: Create a Zap Trigger
- Step 6: Build The Zap Action
- Step 7: Activate Your Automation and Publish Your Zap
- Congratulations!
For systems that LenzVU doesn’t already integrate with directly, Zapier acts as middleware, enabling seamless connections between apps and LenzVU. In this guide, we’ll use Google Sheets as an example app, but keep in mind that Zapier supports many other platforms, including ThriveCart, LinkedIn, and many more.
As long as an app is supported by Zapier, you can configure it to integrate with LenzVU, allowing you to automate workflows and streamline your processes effortlessly.
Step 1: Set Up Your Accounts #
- Create Zapier Account: If you haven’t already, sign up for a Zapier account at zapier.com. Zapier is a platform that enables you to connect different apps and automate workflows.
- Access LenzVU: Log in to your LenzVU account and create a new automation.
Step 2: Create a New Automation On LenzVU and Set The Entrance Condition #
- Go to the Add Clients tab once you have created an automation and set the entrance condition as a Real-Time Event.
- From here, select the LenzVU Events Tab where you should see our LenzVU Webhook Call. Click it.

Step 3: Build The Automation You Want Your Clients To Enter #
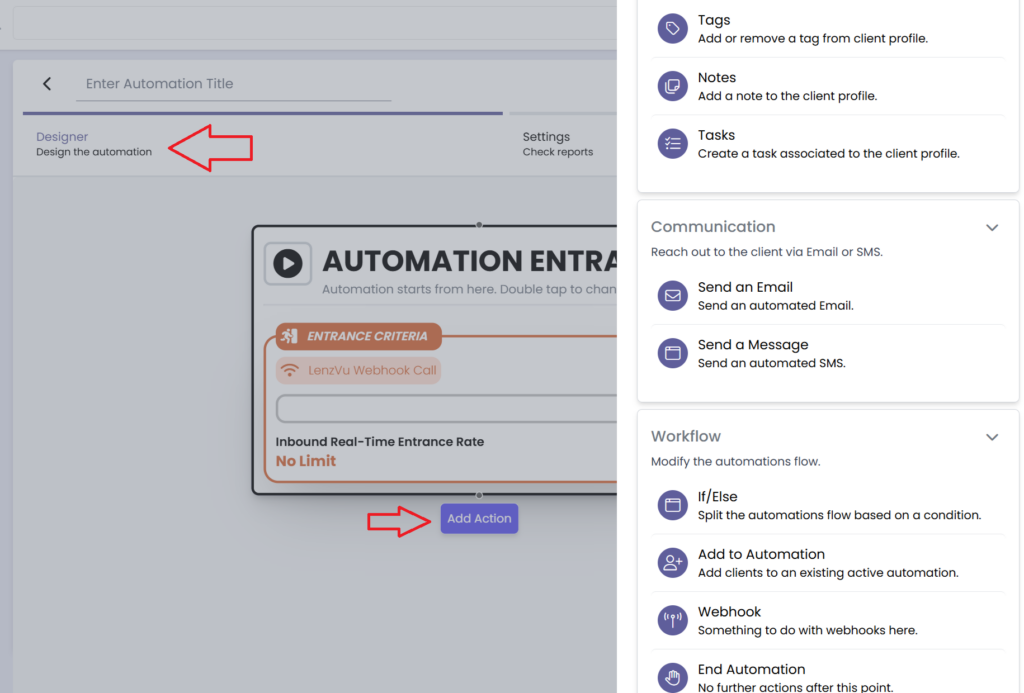
- Go to the Designer tab and select Add Action to begin building the automation.
- Build your automation with the list of features under Actions and once clients enter the Zapier linked spreadsheet, they will go through these exact steps.
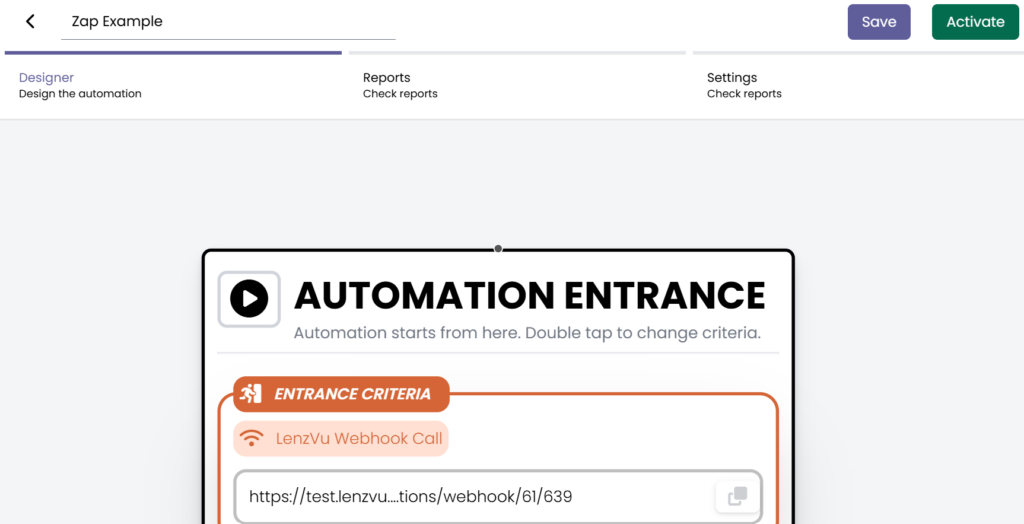
- Once you are done building the automation, give it a title and click save.

Step 4: Make Your Excel Sheet #
- Note: While this example uses Google Sheets, you’re not limited to it. Zapier supports many other apps, so you can use tools like Mailchimp, Airtable, or other supported platforms to achieve similar results.
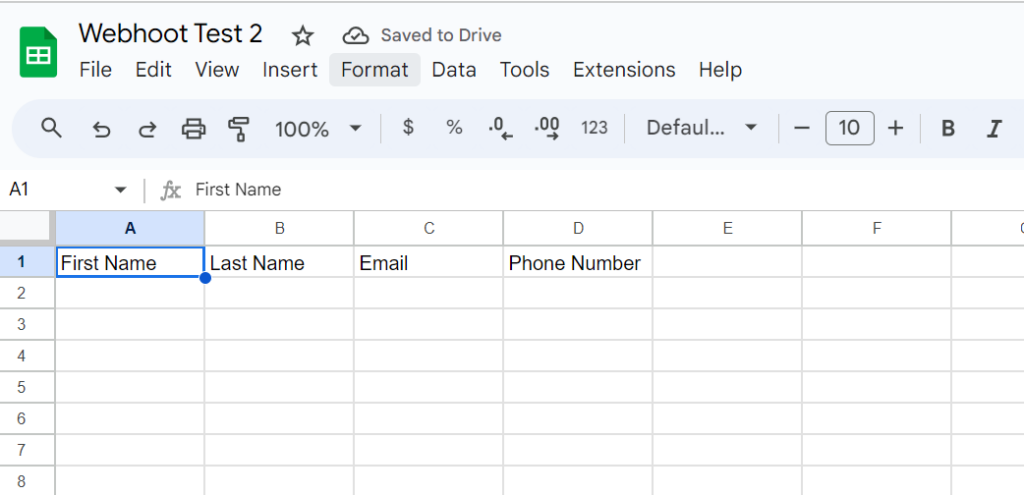
- Create a new google excel sheet with these specific tabs and any other information you want from your clients.
- Make sure to give it a title.

Step 5: Create a Zap Trigger #
- Start a New Zap: In your Zapier dashboard, click the “Create Zap” button. This is where you’ll set up the automation between Excel and LenzVU.

- Choose a Trigger App: Search for and select the Google Excel app as your trigger app. You’ll need to connect your Excel account to Zapier.
- Select Trigger Event: Choose the trigger event that will initiate the automation. Select “New Spreadsheet Row” to trigger the automation whenever a new row is added to an Excel spreadsheet.

- Connect Excel Account: Follow the prompts to connect your Excel account to Zapier. You’ll need to provide the necessary permissions for Zapier to access your Excel data.
- Configure Trigger: Set up the trigger by selecting the specific Excel spreadsheet and worksheet you want to monitor. Zapier will use this as the starting point for your automation.

- Run a test: Input a new row of information into the excel sheet and “Test Trigger” for the system to confirm the webhook is working.

Step 6: Build The Zap Action #
- Choose an Action App: Search for and select the Webhooks by Zapier Feature.
- Select Action Event: Set the action to POST.

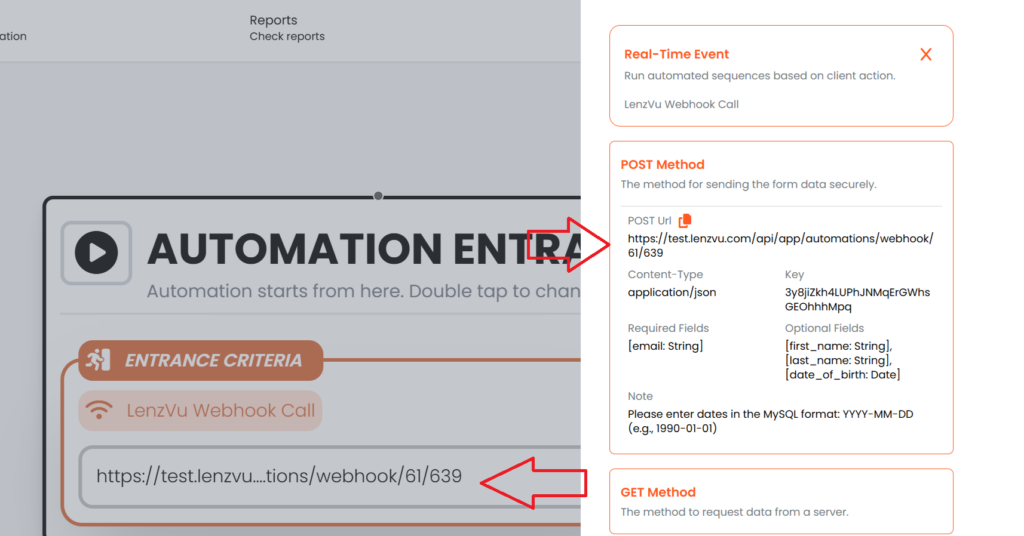
- Connect LenzVU Account: Copy your the Webhook Call link within your LenzVu automation Add Clients tab.

- Paste it within the URL text block and set the “Payload Type” to form

- Now copy the “key” from your add clients tab on LenzVU.

Paste the “key” digits into the Data box and title it key. Also give your other data points these exact titles and select them within the “Insert Data” tab.

Step 7: Activate Your Automation and Publish Your Zap #
Go back to LenzVU and click the activate button within your automation and Publish your Zap on Zapier when ready.

Congratulations! #
You have successfully integrated Zapier with LenzVU to trigger automations using Excel sheets. You are now able to seamlessly transfer data between Excel and LenzVU, eliminating manual tasks and improving efficiency.


