
Need to collect sign-ups, run an event registration, or get a client’s signature on a liability waiver? LenzVU’s form builder can do all three. You can publish a form as its own web page with a shareable link, embed it right into your website, or drop a compact version into an email — and every submission, including signed waivers, gets tracked automatically so you never lose a response.
This guide walks through the whole process in plain language: picking the right kind of form, building it out, styling it to match your brand, and finding your results afterward.
Getting to Know the Form Builder #
Every form in LenzVU starts the same way, so it’s worth getting comfortable with the basics before you build your first one.
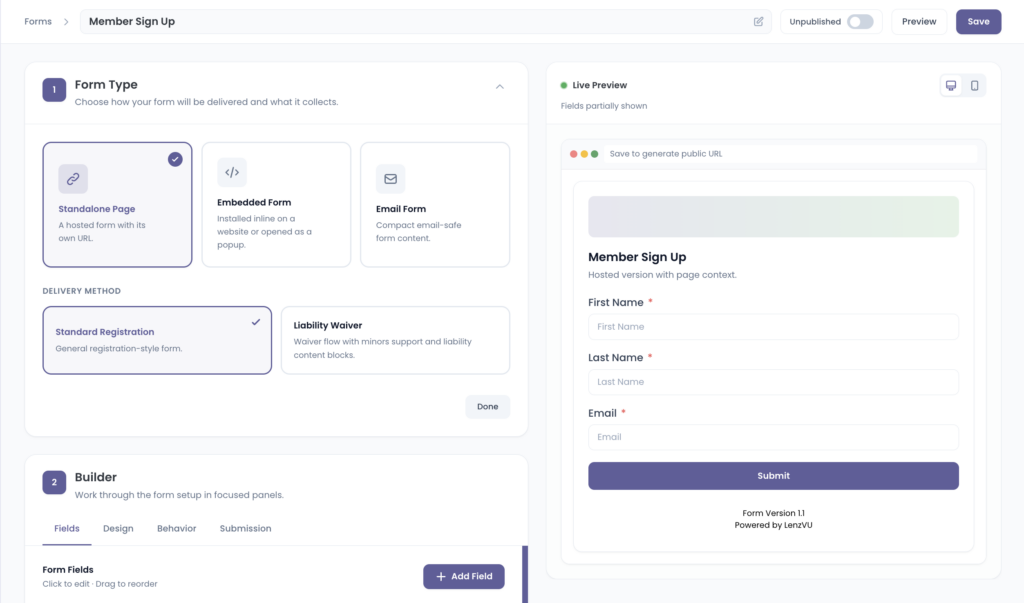
When you open Forms and start a new one, you’ll see two steps on the left side of the screen. Step 1 is where you pick your form type — this is the big decision, because it determines everything else you’ll see later. Step 2 is the Builder, a set of four tabs — Fields, Design, Behavior, and Submission — where you actually put the form together. On the right, a Live Preview updates instantly as you work, so you always know what your visitors will see. You can flip between a desktop and mobile view using the two small icons above it.
You’re never locked into a decision here. Both steps stay open on the page the whole time, so you can go back and change your form type later without losing the fields or styling you’ve already added. You can also rename your form at any time by clicking into the title field at the top of the page.
A few things work the same no matter what kind of form you’re building, so let’s cover those once here — you’ll see them come up again as we go through each form type.
Adding and Organizing Fields #
Every field on your form is shown as a small card with a few consistent parts: a drag handle on the left so you can reorder it, a label and field type (like “text” or “email”) so you know what it is, and Copy, Edit, and Delete buttons on the right. Fields marked Required need to be filled in before someone can submit, and fields marked System — like Email — are built into the platform and can’t be removed.
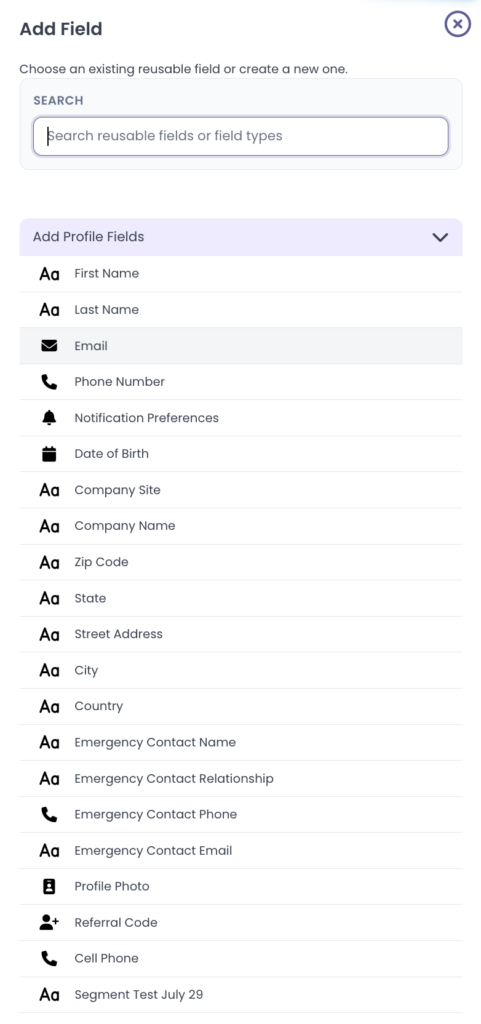
To add a new one, click + Add Field. You’ll get three ways to do it:
- Add Profile Fields pulls from a ready-made list of common client details — things like Phone Number, Date of Birth, Street Address, Emergency Contact info, and more — plus any custom profile fields your business has already set up.
- Create New Field lets you build something from scratch, with field types ranging from Short Text and Email to Signature Pad, Rating, Picture Upload, and Date Picker.
- Add Other Fields is a shortcut to reuse a field you’ve already created on a different form, so you’re not rebuilding the same question twice.
That last option is a nice time-saver: if you reuse a field instead of recreating it, the same question maps to the same data point in your reports, no matter which form it came from.
Sending a Confirmation Email #
Standalone and embedded forms both let you email the person automatically after they submit — just flip on Send email under the Behavior tab’s Confirmation Email section. From there you can set the subject line, sender name, and sending address, and write the email itself using VU Email Editor. The built-in email editor even lets you pick a layout, background color, and add your own CSS if you want more control.
Email forms work a little differently here, since the form is already inside an email you’re sending — more on that in the Email Form section below.
Privacy Notices and Mindbody #
Every form type includes a Show Privacy Policy toggle in General Settings, which adds a short note letting visitors know how their information will be used. There’s also a Mindbody Integration section if your business runs on Mindbody for scheduling or client management.
What Happens After Someone Submits #
Once a form is submitted, you can decide what the visitor sees next, and you can style that confirmation screen — background color, text color, accent color, whether to show your logo, and whether to show a big success checkmark. That styling works the same way across every form type. What differs is the “after submission” action itself, which depends on the form type (we’ll flag that as we go).
Creating a Standalone Form (with an Optional Signature Waiver) #
A Standalone Page is the simplest way to get a shareable link — LenzVU hosts the form on its own web page, and you send people straight to it by email, text, social media, or a QR code. It’s also the only form type where you can collect a legally binding e-signature, which makes it the right choice for liability waivers.
Standard Registration vs. Liability Waiver #
After choosing Standalone Page, pick a Delivery Method:
- Standard Registration is a straightforward sign-up form — great for event registration, lead capture, or general intake.
- Liability Waiver builds out a full signing flow. LenzVU automatically adds Terms and Conditions, a signature warning, disclosure text, and a signature pad where visitors can sign with a mouse, finger, or stylus. If you’re collecting waivers for minors, there’s also an Enable Minors Fields button that adds fields for a parent or guardian’s information and signature.
One thing worth knowing: the signature pad field is fully managed by LenzVU — you can’t rename, copy, or delete it — so it’s worth checking how it looks in your Live Preview before you publish.
Styling Your Standalone Form #
Standalone forms come with a full design editor, so you can genuinely make the page look like your brand. You can set colors for the page background, the form card, and each input field; choose fonts and text sizes for your labels; pick a submit button color and custom button text; and adjust the corner rounding on your fields. There are also toggles to show or hide your logo and the “Powered by LenzVU” footer.
Because this is a real hosted web page, you also get SEO & Social Sharing fields — an SEO title, meta description, and Open Graph image — so the page looks polished and shows up correctly when it’s shared on social media or found in search results.
Confirmation Emails and What Happens After Submission #
Confirmation emails work exactly as described earlier — the one difference is that Liability Waiver forms send this email automatically, since clients should always get a copy of what they signed (that’s what the {document_link} merge tag is for). Standard Registration forms leave it off by default, though you can turn it on any time.
After submission, you can show a Thank you page with a fully custom message (built in a rich text editor) or redirect visitors to another URL, like a booking page.
Publishing and Sharing Your Link #
When you’re ready, flip the Unpublished/Published toggle, hit Preview to double-check everything, and click Save. That’s when LenzVU generates your form’s public URL — you’ll see a “Save to generate public URL” message in the preview until then. From there, share the link however you like: email, text, social posts, or a QR code on a flyer.
Once your link is live, you can also track clicks and engagement on it using LenzVU’s Link Tracking feature.
Creating an Embedded Form for Your Website #
If you’d rather keep visitors on your own site instead of sending them to a hosted page, an Embedded Form is the way to go. It behaves like a normal part of your website, and you install it with a short snippet of code.
Inline or Popup #
After choosing Embedded Form, pick a Display Style:
- Inline places the form directly inside a section of your page, just like any other content block.
- Popup shows the form as an overlay on top of your page — either a centered pop-up window or a small floating button in the corner that visitors click to open it.
Embedded forms are always registration-style. There’s no waiver or signature option here — for that, you’ll want a Standalone Page instead.
Fields work the same way as any other form (see Adding and Organizing Fields above), starting with Company Logo, First Name, Last Name, and Email by default.
Styling an Embedded Form #
Instead of one big theme editor, embedded form styling is broken into smaller, collapsible sections so it’s easy to fine-tune just the piece you care about: a text or image header above the fields, general layout options like field spacing and centering, label styling, input styling, and button styling (text, colors, padding, and corner radius). There’s a Reset button if you want to start over.
Fine-Tuning Your Popup #
If you chose Popup, you’ll see an extra Popup Settings panel in the Behavior tab where you control exactly how and when it shows up:
- Have it appear as a pop-up window or a floating button.
- Time it to appear after a delay (say, 3 seconds), after a certain number of visits, or only for visitors coming from a specific Facebook or Instagram ad.
- Decide whether it shows once per user or every time they visit.
- Optionally let visitors reopen it after they’ve closed it.
The nice part: popup settings go live the moment you save them — you don’t need to touch your embed code again.
What Happens After Submission #
Embedded forms use None (no action) or Redirect to another page rather than an on-page thank-you message, since the form is already living inside your own site.
Getting Your Embed Code #
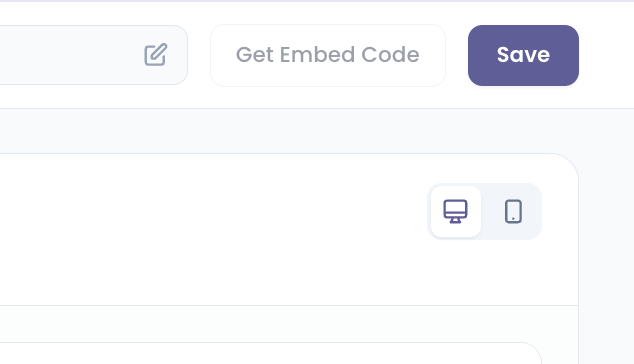
Once your embedded form is ready, click Get Embed Code and paste the snippet into your website’s HTML wherever you want the form to appear.
Creating a Compact Email Form #
An Email Form is a stripped-down version of your form built to be pasted directly into an email — a newsletter sign-up block, a quick RSVP, or a small survey inside a campaign. There’s no delivery method or display style to choose; just select Email Form and you’re ready to build.
The biggest difference here: it starts completely blank. Every other form type comes pre-loaded with a logo and a few default fields, but an email form gives you a clean slate — add exactly what you need using the same + Add Field menu described earlier.
Because email clients handle HTML and CSS inconsistently, there’s no Design tab to fuss over — LenzVU applies a fixed, email-safe layout automatically so it renders reliably everywhere.
You also won’t see the usual Confirmation Email settings, since the form is already sitting inside an email. Instead, there’s an Email Submission Rules section for configuring how those submissions are handled, alongside the same Privacy Policy toggle and Mindbody integration every other form has.
After someone submits, you can still show a Thank you page or redirect them elsewhere, just like a standalone form.
When you’re done, there’s no Preview or Unpublished toggle — just Save. From there, copy the form into your email builder or marketing platform.
Finding and Downloading Your Form Submissions #
Once your forms are live, every response — whether it came from a standalone page, an embedded form, or an email — lands in the same place.
Go to Reports → Form Submissions to see them all. At the top, you’ll get a quick pulse check: total submissions all-time, plus rolling counts for the last 12 months, 30 days, and 7 days. A search bar lets you look up a specific person by name or email.
The table itself gives you a lot of context for each submission: which form and version it came from, the referring page and IP address, how long it took the person to complete it, and their device, browser, and language. Click the three-dot menu on any row to view the full submission or resend the validation email, and use the Download button to export the whole list at once.
If a submission came from a liability waiver, you’ll notice two extra icons next to it — one to download the signed PDF, and one to view or download just the signature. That means you can grab an individual signed waiver whenever you need it, without exporting the entire report.
Tips for Better Forms #
- Pick the right form type for the job. Waivers need a Standalone Page; quick website sign-ups suit an Embedded Form; lightweight in-email asks work best as an Email Form.
- Reuse fields you’ve already built with Add Other Fields, so your data stays consistent across every form.
- Check both desktop and mobile previews before you publish.
- Leave confirmation emails on for waivers so clients always have proof of what they signed.
- Fill in your SEO title, description, and image on standalone forms so the link looks good wherever it’s shared.
- Don’t rush your popup. A short delay and a “once per user” setting usually feel a lot less pushy than an instant, repeating popup.
- Check your submissions report often — it’s the easiest way to spot a form that’s confusing people (long completion times are a good clue) and to keep signed waivers on file.
Frequently Asked Questions #
Can I add a signature to an embedded or email form? No — e-signatures and waiver content are only available on a Standalone Page with the Liability Waiver delivery method.
Can I switch a form’s type after I’ve already started building it? Yes. The Form Type panel stays open and editable the whole time, though switching types can change which fields and design options are available.
Do I need to update my embed code every time I tweak a popup setting? No — popup timing, frequency, and appearance changes go live automatically as soon as you save. Your embed code doesn’t change.
Why is my new email form completely empty? That’s by design — email forms start blank so you can build exactly the compact layout you need using Add Field.
How do I tell which submissions include a signed waiver? Look for the two extra icons — a document icon and a signature icon — next to a submission in your Form Submissions report.
Can I see how many people clicked my form link? Yes, through LenzVU’s Link Tracking feature, which monitors clicks and engagement on any published standalone form link. See the Link Tracking guide →
Related #
Tracking Clicks on Your Shared Form Links — learn how to monitor engagement on any published form link.


